Docker
Learn docker the easy way
Installation
Install Docker based on your OS https://docs.docker.com/get-docker/
Run Docker:
Once installed, docker runs as a daemon for Mac and Linux. For Windows Docker needs a hypervisor (Hyper-V or WSL)
To check docker is installed correctly, run the hello-world image
docker run -d -p 80:80 docker/getting-started
NGC Docker Installation (Docker with GPU Acceleration)
For installing docker with GPU acceleration, Nvidia came up with NGC Docker with NVIDIA CUDA software stack on WSL 2. Read full Documentaion
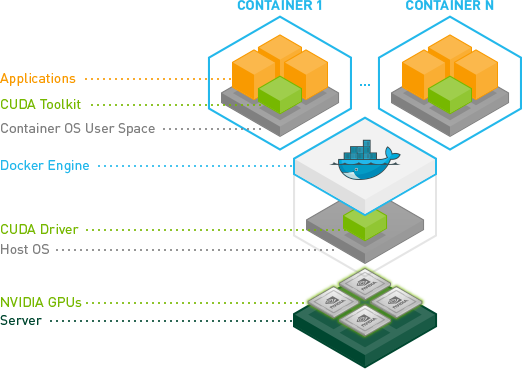
Architecture:
- Here is an image to give the brief overview of the architecture
Pre-Installation:
- Proceed over to Section 2.7 Running CUDA Containers of the CUDA WSL Documentation.
- Exectute each command in each subsection of this section upto
2.7.5 Jupyter Notebook. Don’t Run Subsection 2.7.5 as we will replace it with Nvidia-NGC Docker image. - Again all of the commands are subject to change in the future in the actual documentation but for now here’s a summary.
- Run each of the following inside WSl Ubuntu instance. (It is recommended to run each command one-by-one as to identify the issue if anything goes wrong)
curl https://get.docker.com | sh distribution=$(. /etc/os-release;echo $ID$VERSION_ID) curl -s -L https://nvidia.github.io/nvidia-docker/gpgkey | sudo apt-key add - curl -s -L https://nvidia.github.io/nvidia-docker/$distribution/nvidia-docker.list | sudo tee /etc/apt/sources.list.d/nvidia-docker.list curl -s -L https://nvidia.github.io/libnvidia-container/experimental/$distribution/libnvidia-container-experimental.list | sudo tee /etc/apt/sources.list.d/libnvidia-container-experimental.list sudo apt-get update && sudo apt-get install -y nvidia-docker2 sudo service docker stop sudo service docker start sudo usermod -aG docker $USER - Now to check whether installation was correct or not.
sudo docker run --gpus all nvcr.io/nvidia/k8s/cuda-sample:nbody nbody -gpu -benchmark # sudo won't be necessary once you reboot or restart WSL Instance. - The above should give the output of your GPU and CUDA Compute capability.
Post-Installation:
- Once thats done Go to https://ngc.nvidia.com/catalog/containers/ and search for your Container of choice. I would recommend going with Tensorflow and then Installing PyTorch on it as usual but you can choose whatever you want.
- And as always, the commands might change in the future so look out on the official documentation. But here’s my 2 cents.
docker run --gpus all -it --shm-size=1g --ulimit memlock=-1 --ulimit stack=67108864 -p 8888:8888 nvcr.io/nvidia/tensorflow:21.07-tf2-py3 - Now you might get a fake error saying Nvidia-GPU not detected at this point and it is absolutely okay. This is a limitation which is being currently fixed as time goes by, no need to worry about.
- To check whether your GPU is actually detected or not, execute the following and observe the output.
python -c "import tensorflow as tf; tf.config.list_physical_devices('GPU')" - The output of the above will contain your GPU listed along with the Memory size and other details.
- Now if everything went good, launch
jupyter labwithing the running docker instance withing the Ubuntu WSL instance. - At this point you will see jupyter lab running and an URL is given at the end like this :
http://hostname:8888/?token=e5269ca8c6be83ce9c624c11708d0553d25ee1f1595233fd - Copy this URL in your browser and replace the
hostnamewith localhost so that it ultimately becomeshttp://localhost:8888/?token=e5269ca8c6be83ce9c624c11708d0553d25ee1f1595233fd - And press Enter in your browser, now you should see Jupyter Lab instance Pop Up just fine.
- First thing to do is, click on the
Terminaltile in the Jupyter Lab workspace and launch a terminal just for future works with the terminal or you can do whatever you like. - Now you have a full fledged linux system running NVIDIA-NGC inside Docker inside WSL on Your Windows device.
Parting Notes:
- The Docker Daemon inside the WSL instance isn’t started automatically. So if you close WSL or reboot, you need to relaunch WSL Ubuntu instance and then run
sudo service docker start - Or You can autostart Docker Daemon if you need it always (Not Recommended) By executing this line inside WSL Ubuntu instance outside the Docker Container:
echo 'sudo service docker start' >> ~/.bashrcI repeat DO NOT Run this command inside Docker Container.
- Finally Reboot once and make sure everything is Working as expected.